Tutorial: Live activities and Dynamic Island
Posted in News on October 20, 2022 by Hugo de Groot ‐ 10 min read
As of the 12th of September 2022, Apple’s new iOS has launched. This new OS comes with lots of cool new features like the new lock screen, Livetext and a better privacy-focus. Besides all these cool features Apple also introduces Live Activities.
This blogpost is written by our iOS developer Hugo de Groot
Tutorial: Live activities and Dynamic Island
Live Activities are a new feature in iOS 16 used to notify users of the status of an app. An example Apple gives for which this feature can be used is to track your order status from an app. Live Activities can be shown on the lock screen or on the new Dynamic Island in the iPhone 14 Pro and iPhone 14 Pro Max. With these new features users can track their app from the lock screen or from their Dynamic Island without having to open the app.
One example of how this can be used is when someone orders food from an app. If the user wants to track the status of their delivery now, they have to open the app to see the status of their order. This should be made easier with the introduction of Live Activities. With Live Activities the user can check the status of their order via either the lock screen Live Activity or the Dynamic Island. The data in these Live Activities can update if the status of your app changes. This can be done in-app or through push notifications.
A Live Activity can be active for up to eight hours, unless the app, or the user ends the Live Activity. After eight hours the Live Activity is automatically removed from the Dynamic Island. The Live Activity can however still exist on the lock screen for up to four more hours, before the system removes it automatically. Or the user removes it, whichever comes first.
What’s the difference between Live Activities and Widgets?
Now I can hear you think, this looks an awful lot like Widgets.. What’s the difference? It is true that Widgets and Live Activities share some features. Live Activities even leverage the WidgetKit that is used to create Widgets. But the difference in these two lies in the mechanism used to update the Widget or Live Activity. Live Activities can update their content based on what happens in the app, or through push notifications, by using ActivityKit. Widgets don’t use this, but instead use a timeline to update their status.
When will Live Activities be available?
Live Activities will be available for development in iOS 16.1. At the moment of writing this, Live Activities are only available for development in the newest XCode beta (version 4), but However, Live Activities are already available for use for the people who have an iPhone with the Dynamic Island. The apps/features that can be used in the Dynamic Island are:
Update: Apple just announced the release date for iOS 16.1: October 24th
- Ongoing calls
- SharePlay
- Music apps
- Timer
- Maps
- Camera indication
- Microphone indication
- Voice memos
- Personal hotspot
- Screen recordings
How to use Live Activities
We looked into how you can use Live Activities in your app using the lock screen and the Dynamic Island. Below this section it will get a bit more technical. Be warned if you’re not a developer! Like I mentioned above Live Activities are as of yet not available, unless you use XCode beta version 4. If you have this version installed, you can follow these steps to support Live Activities in your app:
- Create a Widget extension. For more info on this go to: https://developer.apple.com/documentation/WidgetKit/Creating-a-Widget-Extension
- Open your project Info.plist file in your project targets and add “Supports Live Activities”. Set the value to “YES”. If you have your Info.plist file in your file structure you can open the source code of this file and add “NSSupportsLiveActivities”. Set the value to “YES”. Alternatively, if your project does not have a Info.plist file then you can also add this value to the list of custom iOS target properties in your app’s target.
- Create a struct that leverages the ActivityAttributes protocol. This file is used to declare all the static and dynamic data that is used in your Live Activity.
- Use the ActivityAttributes from step three to create an ActivityConfiguration in your Widgets target.
- Add code to add a Live Activity, start it, update it and end it
Add Live Activities to the lock screen
ActivityConfiguration(for: OrderAttributes.self) { context in
    // Create the view that appears on the Lock Screen and as a
    // banner on the Home Screen of devices that don't support the
    // Dynamic Island.
} dynamicIsland: { context in
    // Dynamic Island.
}
To show content in the lock screen using a Live Activity define the view in the ActivityConfiguration. This view does not need to be given a width or a height. Instead it will calculate the right aspect ratio based on the view it needs to display and the available dimensions. The maximum height of a Live Activity in the lock screen is 220 pixels.
Live Activity in Dynamic Island
The Dynamic Island requires more configuration than the lock screen. The lock screen Live Activity consists of a single view to be displayed. The Dynamic Island consists of multiple views that will be displayed in different scenarios. There are four categories within the Dynamic Island. The categories are: DynamicIsland, compactLeading, compactTrailing and minimal.
DynamicIsland
The DynamicIsland view is what users see when they long press on the Dynamic Island. When they long press on the Dynamic Island, it will expand to a bigger view. This view consists of four different views which can all be programmed to show content. The views are: leading, trailing, center and bottom.
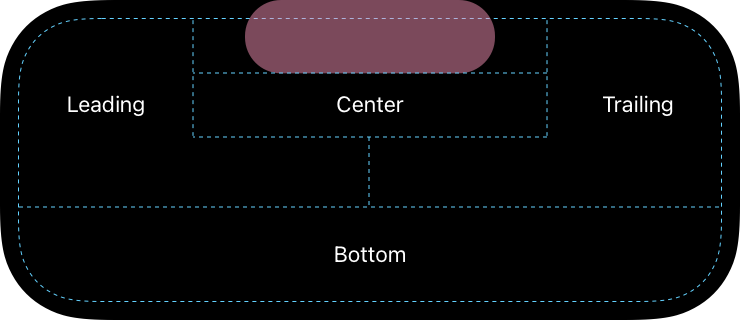
- Center places the content below the TrueDepth camera.
- Leading places the content on the left side of the view, up until the TrueDepth camera. When the content in the view is bigger than the space the leading view has, the content will wrap around the camera.
- Trailing places the content on the right side of the view, up until the TrueDepth camera. When the content in the view is bigger than the space the trailing view has, the content will wrap around the camera.
- Bottom places the content below the leading, trailing and center content.
When a Live Activity is rendered, the system start with rendering the center view. It will keep in mind the minimal width of the leading and trailing content. After the center view has been rendered it will render the leading and trailing views. These views have the same width, unless specified otherwise. The width can be overwritten by giving a priority to the DynamicIslandExpandedRegion.
Compact
The compact leading and trailing views are what the user sees when the Dynamic Island is closed (its initial state). These views can be used to display the logo and the status of the app for example, so a user knows that a Live Activity is active. In case of the example we mentioned above about a food ordering app, the leading space can be used to display the logo of the app, and the trailing space can be used to indicate the progress of the order.
Minimal
The minimal view is what users see when there are multiple Live Activities active at the same time. When this happens, the compact leading view is replaced by the minimal view. In addition to this, a second view is added to the Dynamic Island, separate from the main view. This view is a little circle on the right side of the main Dynamic Island. This view will also display the minimal view defined. Two instances of Live Activities can be shown at the same time. When a user long presses on the Dynamic Island’s compact view, the first Live Activity will unfold. When a user long presses on the Dynamic Island’s minimal view, the second Live Activity will unfold.
ActivityConfiguration(for: OrderAttributes.self) { context in
    // MARK: Live Activity view
    // NOTE: Live Activity Max Height = 220 pixels.
    LiveActivityView(context: context)
} dynamicIsland: { context in
    DynamicIsland {
        // MARK: Expanded view when long pressed
        // MARK: Can be classified into four types: Leading, trailing, center and bottom
        DynamicIslandExpandedRegion(.leading) {
            DynamicIslandLeadingExpandedView()
        }

        DynamicIslandExpandedRegion(.trailing) {
            DynamicIslandTrailingExpandedView()
        }

        DynamicIslandExpandedRegion(.center) {
        }

        DynamicIslandExpandedRegion(.bottom) {
            DynamicIslandStatusView(context: context)
        }
    } compactLeading: {
        Image("coffee-logo")
            .resizable()
            .aspectRatio(contentMode: .fit)
            .padding(.leading, 4)
            .offset(x: -4)
            .font(.title3)
    } compactTrailing: {
        Image(systemName: context.state.status.rawValue)
            .font(.title3)
    } minimal: {
        Image(systemName: context.state.status.rawValue)
            .font(.title3)
    }
}
Start/Update/Stop the Live Activity
Every Live Activity you create can be started, updated and stopped. To start a Live Activity you can call the request function. This function has to receive the attributes and the content state of your Live Activity as paramaters. If you also want to implement remote push notifications to update your Live Activity than you can also give the pushType parameter to the function.
func addLiveActivity() {
    let orderAttributes = OrderAttributes(orderNumber: 26789, orderItems: "Cappuccino")
    let initialContentState = OrderAttributes.ContentState(status: currentSelection)

    do {
        let activity = try Activity<OrderAttributes>.request(attributes: orderAttributes, contentState: initialContentState, pushType: nil)
        currentID = activity.id
        print("Activity added successfully with id: \(activity.id)")
    } catch {
        print(error.localizedDescription)
    }
}

Once a Live Activity has been started, you can update the content by calling the update function. This function is part of the Activity object you receive when you start a Live Activity. To fetch this activity you can use Activity.activities. This will return a list of all the Live Activities that are active.

.onChange(of: currentSelection) { newValue in
    if let activity = Activity.activities.first(where: { (activity: Activity<OrderAttributes>) in
        activity.id == currentID
    }) {
        var updatedState = activity.contentState
        updatedState.status = currentSelection
        Task {
            await activity.update(using: updatedState)
        }
    }
}
It is worth noting that when you update a Live Activity the system wil ignore all the animation modifiers you try to pass to it. Examples are withAnimation() and animation(). Instead it will use the default animation defined by the OS. Text views will be animated by blurring out the previous text and replacing it with the new text. Images use a content transition animation. If you remove or add a view to the user interface based on the content state changing, the view will use a fade in/out effect.
When a Live Activities work is done it is important to end the activity in your app. A Live Activity will stay on the lock screen until a user or the system removes it. To end a Live Activity you have to call the end function. The automatic removal of a Live Activity in the lock screen depends on the dismissal policy that the end function takes in. There are three types of policies that can be used for dismissing the Live Activity. The first one is the standard policy. This will use the standard time it takes for a Live Activity to be removed from the lock screen. The second one is a custom time. This time can be as long as you want, but if it is longer than the default time, the Live Activity will be removed after the default time passes. The third one removes the Live Activity immediately. If the Live Activity ends it could stay on the lock screen for quite some time. That’s why it’s important to update your Live Activity before you end it, so the user is always aware of the final state of the activity when the Live Activity has ended.
func removeActivity() {
    if let activity = Activity.activities.first(where: { (activity: Activity<OrderAttributes>) in
            activity.id == currentID
    }) {
        Task {
            await activity.end(using: activity.contentState, dismissalPolicy: .immediate)
        }
    }
}
Keep developing with our open-source components
After reading this you should be able to implement a Live Activity in your own app! We will give more updates on Live Activities once it is released to the public. Until then, check out our open-source component libraries for Swift, Kotlin and web: Aroma Components