Until the 23rd of December 2023 Apple made the first 25 hours per month of Xcode Cloud free for your team to try out. So there is no better time to start playing with it, learn the basics and create your first automated processes. That’s why we at Coffee IT decided to write a small blogpost about the basics of Xcode Cloud, what you should keep in mind when using it, the basics of how to set it up and the benefits of using it. So that after reading this you’ll be able to start using Xcode Cloud.
This blogpost is written by our iOS developer Mark
What is Xcode Cloud
Xcode Cloud is Apple’s own continuous integration and delivery platform, completely built into the Apple ecosystem. So it’s available within Xcode itself and also in App Store Connect. Because everything is interconnected it fits well in Apple’s philosophy to create a whole ecosystem for the developers. So now with Xcode Cloud it’s possible without the use of any third-party tools to create your app and distribute it to TestFlight completely automated.
What can you do with Xcode Cloud
Xcode Cloud itself offers some nice features which makes it really a must use while developing apps. As I said here before it’s completely integrated in Xcode itself, because of this, all of the data is visible within Xcode. So for example if you want to make a build from Xcode, but don’t want to be blocked by archiving, you can now create Automated Workflows which can be triggered by hand or for example can be triggered by pull-requests or merges to certain branches. So for example, if you finished building a new feature and want it distributed immediately to your tester, you can start an Automated Workflow either by hand or for example when the feature branch has any changes. This workflow has a few steps; it runs all the test targets, makes an archive and uploads that archive to App Store Connect and distributes it to certain test groups. Sounds amazing right?
As I told you, it’s possible to also run all your test targets and perform the tests. The really nice thing is that you can select all kinds of devices or device configurations to run those tests on and Apple can run those tests in parallel so they’re done simultaneously and there is no time loss. It keeps getting better if you ask me.
And to remind you once more, all of this is integrated within Xcode and App Store Connect. So all of your test results will be visible in Xcode the same as you would look at your test results when run locally. Of course your tests won’t fail because you write great code 😉. But on the slight chance that you did make a small mistake and one or more of your tests fail, you can see where it failed and on what line it failed. The cool thing about this is, you can immediately dive into the code because you are already working in Xcode. So click on the failed line with CTRL + Command / CMD and you are already at the definition of the code where it went wrong. This improves your development speed and helps solving possible bugs so much.
How to set up an Automated Workflow
Probably most people want to know what is possible when setting up Automated Workflows, how to set up a workflow and what everything means. I will go briefly into the details of how to set up a basic Automated Workflow which is triggered by a code change on a branch. This workflow will test the code, archive it and then distribute it to an internal TestFlight group for testing.
The first thing you have to do if you want to create an Automated Workflow is to go to your project navigation, open the report navigator and select cloud.

After you’ve selected this and never interacted with Xcode Cloud before you’ll see a Get started button, as you would guess, clicking on this button will get you started. This will open a pop-up within Xcode where you’ll have to select the product you want to use Xcode Cloud for, please select the app you want to use it for. Most of the time you just have one option. After you press next Xcode starts configuring your first default Automated Workflow. Just press next here as well.
To get started Xcode Cloud needs access to all the repositories the project is using, so please press the Grant Access button(s) for the repositories you are using. This will take you to the App Store Connect website, press Grant Access again and when it’s done you’re redirected to Xcode and see that it has permission to use the repository. Now press Next again and after that Complete and voilà you have made your first Automated Workflow.
General & Environment
Now we can start changing this to the one we said we were making. So give it a name you like. I would always go for something descriptive so you know what the flow actually does. I first start with the scheme name I am using in this case will be test and then followed by the steps; so something like {BRANCH} -> {SCHEME} -> {STEP_1} -> {STEP_2} which could result in something like Develop -> Test -> Run tests -> Internal TestFlight. Give it a nice description for your fellow team members to know what it does without them having to look at the configuration.
Next up is selecting the environment, basically this is the simulation on what it will build. Here you can choose the Xcode version and MacOS version you like, Apple’s default falls back to Latest Release because this makes sure you’ll have all the latest updates (including security updates).
After this we’ll have to set up the start conditions, this defaults to branch changes but I will discuss all the possibilities briefly, but in this setup we’ll end up with the branch change as start condition as well.
Start conditions
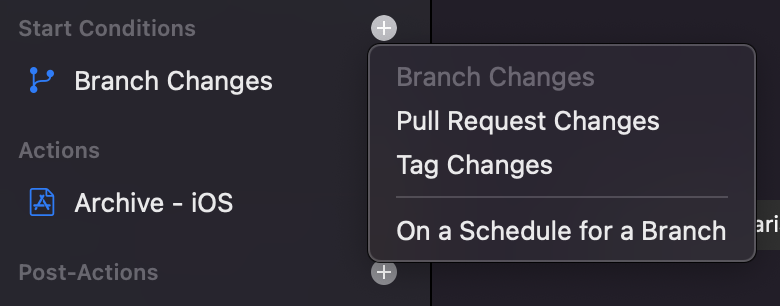
First of all, the changes in either one of the three options can be triggered by any changes (so if any file changes) or by custom conditions in which you can determine if it should or shouldn’t start a new build if a certain file changes.
- Branch Changes: this does basically what it says. If there changes, this workflow will be triggered. So for example if you set it up with the branch
developand merge or push code towards this branch, this will trigger this Automated Workflow. This is the one we will be using in the setup. - Pull Request Changes: this one will be triggered if either there are changes to the selected
sourceortargetbranch in a pull request. So for example if you make a pull request fromtesttoacceptanceand there are changes to either one of them this will trigger this Automated Workflow. - Tag Changes: if you create or update a certain tag this will trigger the Automated Workflow.
- On a schedule for a branch: I think this one is a little different then the ones above because this one doesn’t look at changes but runs on a schedule. You can put the frequency on
hourly,dailyandweeklyselect the days it should run on and which branch it should use and then it will run this on this schedule. This is probably not useful for making builds, but could be really useful if you want your tests to run every Friday for example.
Actions
The following part of setting up the Automated Workflow is choosing the actions it should perform. Here we have four options you can choose.
1. Archive (we will be using this in our setup)
- Platform: choose the platform the app should be archived for (iOS, MacOS, TvOS or WatchOS).
- Scheme: choose the scheme it should use for the archive in our case
Test. - Deployment preparation: you can choose none, TestFlight or TestFlight and App Store. I guess you will always choose one of the last two; if you want it for internal testing, like we want in our setup you go for TestFlight only. If it’s a production build choose TestFlight and App Store and make sure you mark the clean checkbox in the environment step.
2. Analyze (we will not be using this in our setup)
- Platform: choose the platform the app should be analyzed for (iOS, MacOS, TvOS or WatchOS).
- Scheme: choose the scheme it should use to analyze the project.
- Built for: either choose any simulator or any iOS device. In my opinion you are always best off using any iOS device because that’s what the actual app will run on.
- Requirement: if the analyzing should pass or not for our complete workflow to succeed.
3. Build (we will not be using this in our setup)
- Platform: choose the platform the app should be built for (iOS, MacOS, TvOS or WatchOS).
- Scheme: choose the scheme it should use to build the project.
- Built for: either choose any simulator or any iOS device.
4. Test (we will be using this in our setup)
- Platform: choose the platform the app should be tested for (iOS, MacOS, TvOS or WatchOS).
- Scheme: choose the scheme it should use. In our case it will be using the
Testscheme. - Requirement: if the tests should pass or not for our complete workflow to succeed. Always go for pass here. Why would you ever want to succeed if it fails, right 🤔.
- Test: the only option here is to use scheme settings.
- Devices: the final thing you can select here are all the devices it should test on with which OS. Be creative here or go with Apple’s default.
Post-Actions
The last step in setting up your workflow is setting up your post-actions. For the TestFlight steps to work, you’ll need the archive step, because it needs an archive to be distributed to the testers.
- TestFlight External Testing: this is for distributing to TestFlight for external testers. You can either select multiple external groups or individual testers. All of the people & groups added will receive the TestFlight build when it’s done processing on App Store Connect. This step is mainly used for production builds which will always reach the external audience but now you can already share some new features to your selected group of external testers.
- TestFlight Internal Testing: this is for distributing to TestFlight for internal testers. Here you can select any of your internal groups. This is mainly used for internal builds for example for QA or for tryouts which will only be shared with the team. This is the step we’ll be using in our workflow.
- Notify: then finally there is a notify option to either send emails or slack messages on build success and build failures. This can be handy if you have a slack channel which needs to be updated on the workflows or if the lead developer needs to receive emails about it.
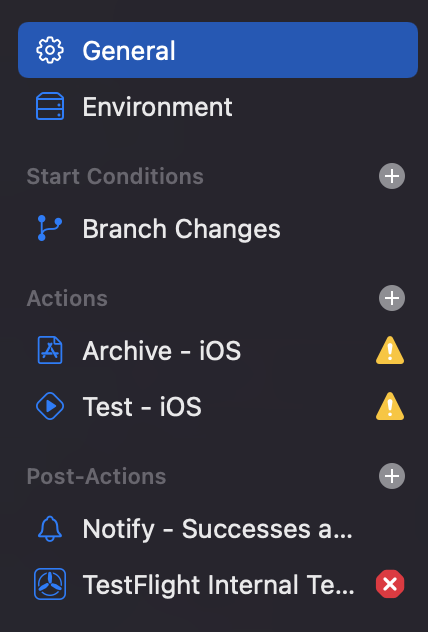
Then when we’ve set up everything correctly (don’t mind the warnings and errors in the image below) this is what our Automated Workflow will look like.
What to keep in mind when setting up your workflows?
There are three things I bumped into when setting up my first Automated Workflow:
Package.resolved file
First of all I think most of you know what the Package.resolved file is if you’ve ever used Swift Packages. Basically in that file are all the dependencies used in your project and which version of the dependency, so the Swift Package Manager knows which dependencies to load when running the project. But when I started on my workflow I got errors that the Package.resolve file was missing on the remote. This happened because usually when I start projects I go to www.gitignore.io and let that website generate my .gitignore file, so that I don’t have to think about all the stuff that needs to go in there. But because of this, my Package.resolved file was also ignored and not on my remote repository.
But this file needs to be on the remote, because Xcode Cloud uses the remote repository to test, build, archive or analyze the project and if you are using Swift Packages, it needs to know which packages to bring in. So always make sure your Package.resolved file is on your remote for Xcode Cloud to work.
This is also a guideline provided by Apple. I quote: “Following the best practice for using Swift package dependencies in a CI/CD environment, Xcode Cloud doesn’t use automatic package resolution and instead relies on the Package.resolved file to resolve your dependencies. If you use Swift package dependencies in your project, make sure to include the Package.resolved file in your Git repository and commit any changes to it. Don’t include the file in your .gitignore file.”. 1
System dependencies
If you have scripts that depend on tools you have installed locally such as linters or generators. Xcode Cloud needs to know about them because otherwise it can’t generate needed files or run needed lints. For this example, let’s say I have SwiftGen & SwiftLint locally installed on my system and need them to make my archive succeed, because SwiftGen generates some Localizable files which are generated on build time. Apple introduced something called Custom build scripts, this can be used to perform certain actions.
For this example I will first explain the pre-xcodebuild option. The pre-xcodebuild options can perform a script before the build is done, so in our case install SwiftGen & SwiftLint. So first of all in the root of your project besides all your target folders, create a new folder called ci_scripts, in this folder create a new file called ci_pre_xcodebuild.sh don’t add this to any target and make this file an executable by running the following command in the terminal chmod +x ci_pre_xcodebuild.sh.
Now we will fill the file with the code needed to install those two dependencies
/bin/bash -c "$(curl -fsSL https://raw.githubusercontent.com/Homebrew/install/HEAD/install.sh)"
brew install swiftgen
brew install swiftlint
First of all we install brew with the cURL command, after that we install the two dependencies. After this script has successfully finished the building will continue and it will not fail on not being able to run SwiftLint or not being able to find the generated files by SwiftGen.
It’s also still possible to install these dependencies using Cocoapods. If you decide to install them using Cocoapods you can remove your ci_pre_xcodebuild.sh. Because for installing cocoapods its better to use another build script, namely the post-clone script. You’ll follow the exact same steps as above, but you create a different file called ci_post_clone.sh and also make this an executable by running chmod +x ci_post_clone.sh. This script is executed after Xcode Cloud successfully cloned your repository and because normally pods are installed after cloning this feels as the better option to install your pods. This is what your script will look like if you have to install cocoapods itself and run pod install.
/bin/bash -c "$(curl -fsSL https://raw.githubusercontent.com/Homebrew/install/HEAD/install.sh)"
brew install cocoapods
pod install
If you still have other dependencies outside of the cocoapods, you can still use the ci_pre_xcodebuild.sh script to install those dependencies. Because you are allowed to have one script for all the possibilities, which can be found here.
Private cocoapods
As I mentioned in the topic of the System dependencies, you are also able to run pod install. But if you have private repo’s the first few times the script will fail because it needs access to the repo. Everytime a build fails because of a private cocoapod, it’ll show up in App Store Connect, under Settings -> Additional Repositories. For Xcode Cloud to work you’ll need to grant access to all of them because it says the following: “The following private repositories were discovered from Git submodules, Custom Scripts, and Dependency Managers. Only repositories that have been approved can be used for building “App”.” and it probably discovers them while running and failing. This is in my opinion they have to fix by allowing you to manually add repositories which you grant access to.
Benefits
| Benefit | Explanation |
|---|---|
| Costs | Until the 23rd of December 2023 the first 25 hours are free of charge after that’ll be $14,99 per month. But with 25 hours a month you can do quite a lot for smaller apps, when you get bigger you’ll need a better subscription, but you’ll probably have to pay for it as well. Also all other platforms will bring cost with it. |
| Integrated in Apple’s ecosystem | Using Xcode Cloud is super useful because it’s completely integrated in the Apple ecosystem. You can use it directly from Xcode and can also use it to directly distribute to groups within TestFlight and you don’t need any third-party for it |
| Testing | Xcode Cloud makes it easy to run all your tests (also in parallel) on all kinds of devices and because it’s on Apple’s ecosystem it immediately runs on actual Apple hardware |
| Sharing | It’s easily accessible for everyone in the team with the correct rights to change and manage workflows. But the test results will be visible in Xcode itself for all the developers so it’s way easier to pick-up bugs that are pointed out from the tests by every team member. |
| Workflows | It’s really easy to create all kinds of workflows, ones that actually deliver stuff to TestFlight or only to continuous integration for testing with every code change |
| Building | It’s really easy to build in one workflow for different OS’s. For example if your app has a Companion Watch App you can also build and archive that one in the same workflow |
And to sum it all up, I am really hyped about the use and application of Xcode Cloud. This is because it all comes together really nicely, the biggest advantage with using this integration with tests is that everyone can actually see the test results and see where it went wrong or what threw an error. While with other tools this wasn’t directly integrated into Xcode and you had to spit through the logs to see what failed and had to translate that back to your own code, while now it’s just a few clicks away.
The same thing counts for the test logs, counts for the build logs. Now you can immediately in Xcode see what went wrong while building or archiving and so it’s much easier to find the problem and solve it.
And of course the easy implementation of all kinds of workflows which makes it applicable for everyone. All the steps are pretty straightforward and besides a few small hiccups I had my first workflow running very quickly.
Last but not least, you can now start archives using Xcode Cloud for small features without development being blocked or waiting for merges to be done to trigger a build using a third-party tool, it just feels way easier now. So after you’ve read this blog, make your first workflow and let us know how it went 📈.
https://developer.apple.com/documentation/xcode/making-dependencies-available-to-xcode-cloud ↩︎